delimiter ;; create procedure idata() begin declare i int; set i=1; while(i<=10000)do insert into t1 values(i,i); set i=i+1; end while; end;; delimiter ;
call idata();
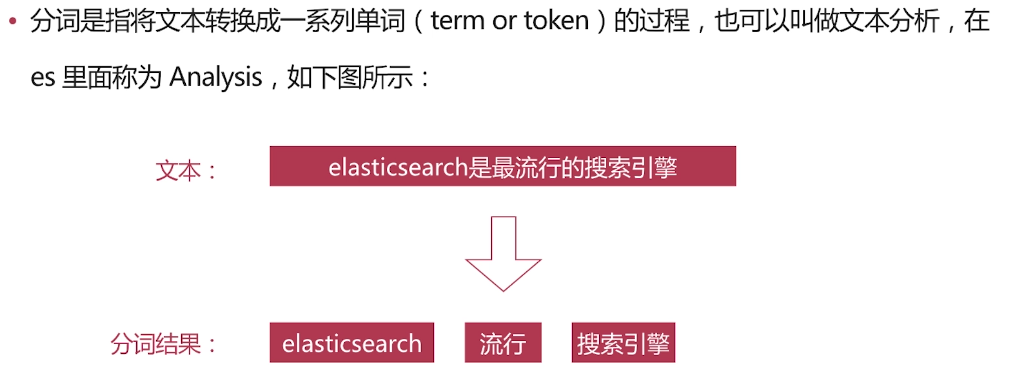
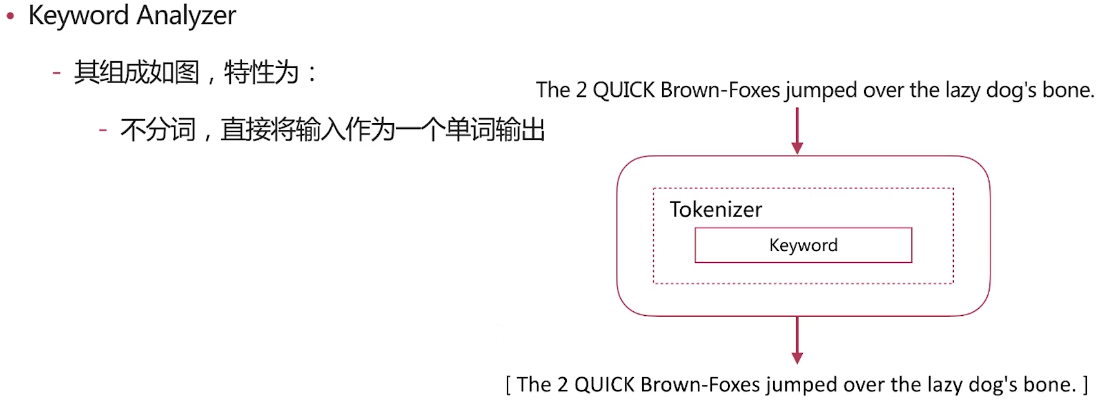
几种场景类型分析
第一类:查询长时间不返回
执行下面的sql
1
mysql> select * from t1 where id=1;
查询长时间不返回
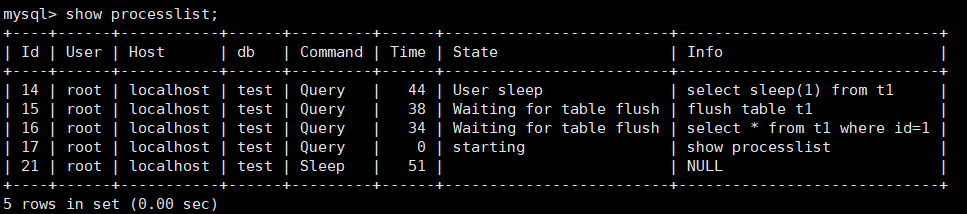
一般碰到这种情况的话,大概率是表 t1 被锁住了。接下来分析原因的时候,一般都是首先执行一下 show processlist 命令,看看当前语句处于什么状态。
然后再根据状态去分析产生的原因,以及能否复现
等MDL锁
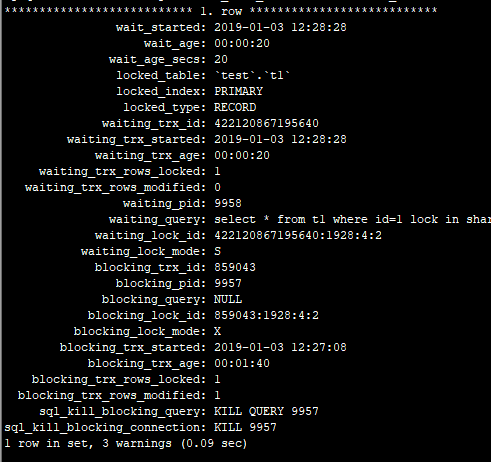
如下图所示,就是使用 show processlist 命令查看 Waiting for table metadata lock 的示意图。 这个状态表示的是,现在有一个线程正在表 t1 上请求或者持有 MDL 写锁,把 select 语句堵住了。
不过,在 MySQL 5.7 版本下复现这个场景,也很容易。
SessionA
SessionB
lock table t1 write
select * from t1 where id=1;
session A 通过 lock table 命令持有表 t1 的 MDL 写锁,而 session B 的查询需要获取 MDL 读锁。所以,session B 进入等待状态。
这类问题的处理方式,就是找到谁持有 MDL 写锁,然后把它 kill 掉。
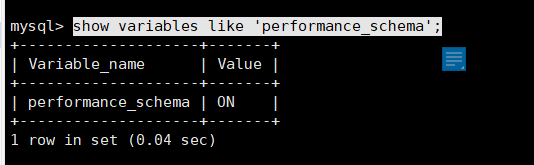
但是,由于在 show processlist 的结果里面,session A 的 Command 列是“Sleep”,导致查找起来很不方便。不过有了 performance_schema 和 sys 系统库以后,就方便多了。(MySQL 启动时需要设置 performance_schema=on,相比于设置为 off 会有 10% 左右的性能损失)
查看是否支持performance_schema
1
select*from information_schema.engines where engine ='performance_schema';
是否开启performance_schema
1
show variables like'performance_schema';
通过查询 sys.schema_table_lock_waits 这张表,我们就可以直接找出造成阻塞的 process id,把这个连接用 kill 命令断开即可。
等FLUSH
另一种场景 我在表t1上执行这样一条sql
1
mysql> select * from information_schema.processlist where id=1;
在 session A 中,我故意每行都调用一次 sleep(1),这样这个语句默认要执行 1 万秒,在这期间表 t 一直是被 session A“打开”着。然后,session B 的 flush tables t 命令再要去关闭表 t,就需要等 session A 的查询结束。这样,session C 要再次查询的话,就会被 flush 命令堵住了。
下面是show processlist 结果
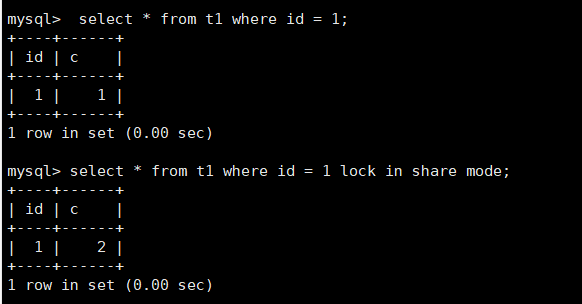
等行锁
现在,经过了表级锁的考验,我们的 select 语句终于来到引擎里了。
1
mysql> select * from t1 where id=1 lock in share mode;
{ "error":{ "root_cause":[ { "type":"illegal_argument_exception", "reason":"Fielddata is disabled on text fields by default. Set fielddata=true on [title] in order to load fielddata in memory by uninverting the inverted index. Note that this can however use significant memory. Alternatively use a keyword field instead." } ], "type":"search_phase_execution_exception", "reason":"all shards failed", "phase":"query", "grouped":true, "failed_shards":[ { "shard":0, "index":"movies", "node":"6pljLZ0vQQKObirnkOOsnw", "reason":{ "type":"illegal_argument_exception", "reason":"Fielddata is disabled on text fields by default. Set fielddata=true on [title] in order to load fielddata in memory by uninverting the inverted index. Note that this can however use significant memory. Alternatively use a keyword field instead." } } ], "caused_by":{ "type":"illegal_argument_exception", "reason":"Fielddata is disabled on text fields by default. Set fielddata=true on [title] in order to load fielddata in memory by uninverting the inverted index. Note that this can however use significant memory. Alternatively use a keyword field instead.", "caused_by":{ "type":"illegal_argument_exception", "reason":"Fielddata is disabled on text fields by default. Set fielddata=true on [title] in order to load fielddata in memory by uninverting the inverted index. Note that this can however use significant memory. Alternatively use a keyword field instead." } } }, "status":400 }
{ "error":{ "root_cause":[ { "type":"illegal_argument_exception", "reason":"Can't load fielddata on [username] because fielddata is unsupported on fields of type [keyword]. Use doc values instead." } ], "type":"search_phase_execution_exception", "reason":"all shards failed", "phase":"query", "grouped":true, "failed_shards":[ { "shard":0, "index":"test_doc_values", "node":"6pljLZ0vQQKObirnkOOsnw", "reason":{ "type":"illegal_argument_exception", "reason":"Can't load fielddata on [username] because fielddata is unsupported on fields of type [keyword]. Use doc values instead." } } ], "caused_by":{ "type":"illegal_argument_exception", "reason":"Can't load fielddata on [username] because fielddata is unsupported on fields of type [keyword]. Use doc values instead.", "caused_by":{ "type":"illegal_argument_exception", "reason":"Can't load fielddata on [username] because fielddata is unsupported on fields of type [keyword]. Use doc values instead." } } }, "status":400 }
{ "error":{ "root_cause":[ { "type":"illegal_argument_exception", "reason":"Result window is too large, from + size must be less than or equal to: [10000] but was [10010]. See the scroll api for a more efficient way to request large data sets. This limit can be set by changing the [index.max_result_window] index level setting." } ], "type":"search_phase_execution_exception", "reason":"all shards failed", "phase":"query", "grouped":true, "failed_shards":[ { "shard":0, "index":"movies", "node":"6pljLZ0vQQKObirnkOOsnw", "reason":{ "type":"illegal_argument_exception", "reason":"Result window is too large, from + size must be less than or equal to: [10000] but was [10010]. See the scroll api for a more efficient way to request large data sets. This limit can be set by changing the [index.max_result_window] index level setting." } } ], "caused_by":{ "type":"illegal_argument_exception", "reason":"Result window is too large, from + size must be less than or equal to: [10000] but was [10010]. See the scroll api for a more efficient way to request large data sets. This limit can be set by changing the [index.max_result_window] index level setting.", "caused_by":{ "type":"illegal_argument_exception", "reason":"Result window is too large, from + size must be less than or equal to: [10000] but was [10010]. See the scroll api for a more efficient way to request large data sets. This limit can be set by changing the [index.max_result_window] index level setting." } } }, "status":400 }
分页与遍历-scroll
遍历文档集的api ,以快照的方式来避免深度分页的问题
不能用来做实时搜索,因为数据不是实时的
尽量不要使用复杂的sort条件,使用_doc最高效
使用稍嫌复杂
第一步需要发起1个scroll search:
es在收到该请求后会根据查询条件创建文档Id合集的快照
request
1 2 3 4 5
GET movies/_search?scroll=5m { "size": 1 } 5m至快照有效时常,size返回条数
GET test_search_index/_search?q=username:(alfred NOT way)
username必须含有way的
request
1
2
GET test_search_index/_search?q=username:(alfred +way) +会被识别为空格 GET test_search_index/_search?q=username:(alfred %2Bway)
范围查询:
request
1 2 3 4 5 6
GET test_search_index/_search?q=username:alfred age:>26 #username字段包含alfred或者age大于26 GET test_search_index/_search?q=username:alfred AND age:>20 #username字段包含alfred并且age大于20 GET test_search_index/_search?q=birth:(>1980 AND <1990) #birth字段在1980到1990之间
正则表达式和通配符:
request
1 2
GET test_search_index/_search?q=username:alf* GET test_search_index/_search?q=username:/[a]?l.*/
模糊查询和近似度:
request
1 2 3 4
GET test_search_index/_search?q=username:alfed~1 GET test_search_index/_search?q=username:alfd~2 GET test_search_index/_search?q=job:"java engineer" GET test_search_index/_search?q=job:"java engineer"~1
range过滤器也可以用于字符串。字符串范围根据字典或字母顺序来计算。例如,这些值按照字典顺序排序: 假如我们想让范围从 a 开始而不包含 b,我们可以用类似的 range 过滤器语法:
1 2 3 4 5 6
"range":{ "title":{ "gte":"a", "lt":"b" } }
数字和日期字段的索引方式让他们在计算范围时十分高效。但对于字符串来说却不是这样。为了在字符串上执行范围操作,Elasticsearch 会在这个范围内的每个短语执行 term 操作。这比日期或数字的范围操作慢得多。 字符串范围适用于一个基数较小的字段,一个唯一短语个数较少的字段。你的唯一短语数越多,搜索就越慢。
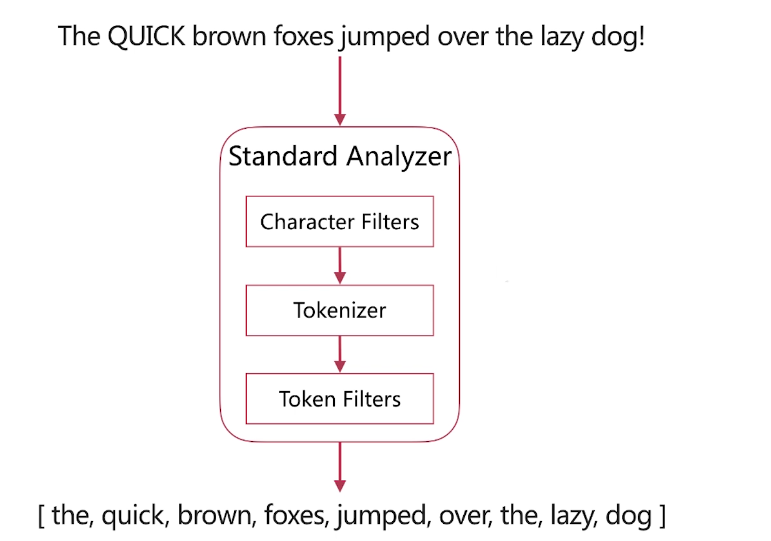
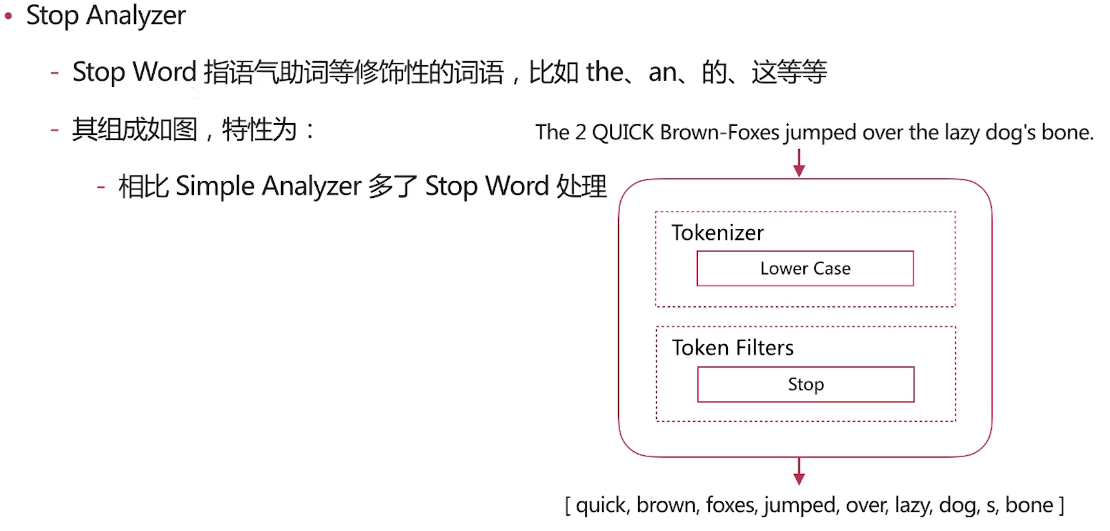
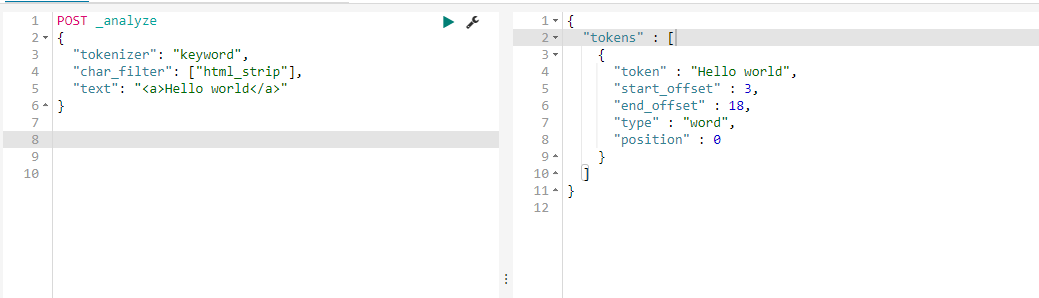
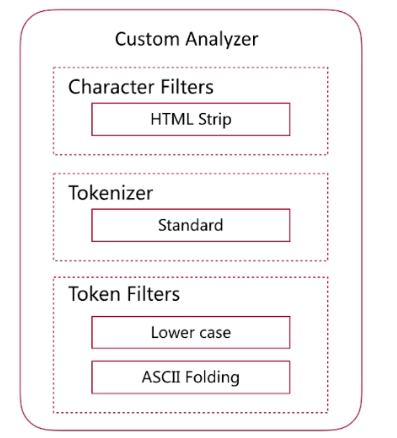
由上面的结果看一看出我们自定义的分词将<a>This is a <b>Text</b></a> 分成了this,is,a,text 分成这种结果的原因是分词使用了如下图的分词器
我们由前面的分词器的解释可了解到lowercase将元文本规范化为小写,asciifolding 类型的词元过滤器,将不在前127个ASCII字符(“基本拉丁文”Unicode块)中的字母,数字和符号Unicode字符转换为ASCII等效项(如果存在)。 html strip将文本的html标签进行了过滤,standard见上面的介绍,所以最终自定义分词分成了this,is,a,text这样的结果,而上面query里面的<div>this is<div>首先html标签被过滤掉,所以不管什么标签都可以满足条件,其次 this is用_analyze分析会被拆成this,is也符合分词匹配结果,如果query里面的this is变为thisis就不符合当前匹配结果了
LOCK IN SHARE MODE是读锁(只是不让别人写),FOR UPDATE是写锁(还不让别人加读锁)
InnoDB行锁
InnoDB行锁是通过索引上的索引项来实现的,InnoDB这种行锁实现特点意味者:只有通过索引条件检索数据,InnoDB才会使用行级锁,否则,InnoDB将使用表锁! 如select * from t where d=5 for update;会锁住d=5索引覆盖范围的相关行,如果没有索引则会锁住所有行
间隙锁 (Gap Lock)
行锁只能锁住行,但是新插入记录这个动作,要更新的是记录之间的“间隙”。因此,为了解决幻读问题,InnoDB 只好引入新的锁,也就是间隙锁 (Gap Lock)。 间隙锁,锁的就是两个值之间的空隙。比如文章开头的表 t,初始化插入了 6 个记录,这就产生了 7 个间隙。 这样,当你执行 select * from t where d=5 for update 的时候,就不止是给数据库中已有的 6 个记录加上了行锁,还同时加了 7 个间隙锁。这样就确保了无法再插入新的记录。
根据原则 2 ,只有访问到的对象才会加锁,这个查询使用覆盖索引,并不需要访问主键索引,所以主键索引上没有加任何锁,这就是为什么 session B 的 update 语句可以执行完成。
但 session C 要插入一个 (7,7,7) 的记录,就会被 session A 的间隙锁 (5,10) 锁住。
需要注意,在这个例子中,lock in share mode 只锁覆盖索引,但是如果是 for update 就不一样了。 执行 for update 时,系统会认为你接下来要更新数据,因此会顺便给主键索引上满足条件的行加上行锁。
这个例子说明,锁是加在索引上的;同时,它给我们的指导是,如果你要用 lock in share mode 来给行加读锁避免数据被更新的话,就必须得绕过覆盖索引的优化,在查询字段中加入索引中不存在的字段。比如,将 session A 的查询语句改成 select d from t where c=5 lock in share mode。
主键索引范围锁
SessionA
SessionB
SessionC
begin; select * from t where id >=10 and id<11 for update;
insert into t values(7,7,7); result:(ok) insert into t values(13,13,13); result:(blocked)
所以,session A 这时候锁的范围就是主键索引上,行锁 id=10 和 next-key lock(10,15]。
非唯一索引范围锁
SessionA
SessionB
SessionC
begin; select * from t where c>10 and c<11 for update;
insert into t values(8,8,8); result:(blocked)
update t set d=d+1 where id=15; result:(blocked)
这次 session A 用字段 c 来判断,加锁规则跟主键索引范围锁唯一的不同是:在第一次用 c=10 定位记录的时候,索引 c 上加了 (5,10] 这个 next-key lock 后,由于索引 c 是非唯一索引,没有优化规则,也就是说不会蜕变为行锁,因此最终 sesion A 加的锁是,索引 c 上的 (5,10] 和 (10,15] 这两个 next-key lock。
唯一索引范围锁特殊场景
SessionA
SessionB
SessionC
begin; select * from t where id >10 and id<=15 for update;
update t set d=d+1 where id=20; result:(blocked)
insert into t values(16,16,16); result:(blocked)
session A 是一个范围查询,按照原则 1 的话,应该是索引 id 上只加 (10,15] 这个 next-key lock,并且因为 id 是唯一键,所以循环判断到 id=15 这一行就应该停止了。 但是实现上,InnoDB 会往前扫描到第一个不满足条件的行为止,也就是 id=20。而且由于这是个范围扫描,因此索引 id 上的 (15,20] 这个 next-key lock也会被锁上。
funcFib(n int)int { if n == 0 { return0 } if n == 1 { return1 } var dp = make([]int, n+1) dp[0] = 0 dp[1] = 1 for i := 2; i <= n; i++ { dp[i] = dp[i-1] + dp[i-2] } return dp[n] }
时间复杂度O(n)
空间复杂度O(n)
动态规划题目一般往往可以优化空间复杂度,本道题也一样,可以将dp[0]、dp[1]作为两个变量值指针,然后用sum接收一下两个变量的和,在对dp[0]、dp[1]进行前移dp[0] = dp[1],dp[1] = sum
1 2 3 4 5 6 7 8 9 10 11 12 13 14 15
funcFib(n int)int { if n == 0 { return0 } if n == 1 { return1 } var dp, sum = [2]int{0, 1}, 0 for i := 2; i <= n; i++ { sum = dp[0] + dp[1] dp[0] = dp[1] dp[1] = sum } return sum }
funcClimbStairs(n int)int { if n == 1 || n == 0 { return1 } if n == 2 { return2 } var dp [3]int dp[1] = 1 dp[2] = 2 sum := 0 for i := 3; i <= n; i++ { sum = dp[1] + dp[2] dp[1] = dp[2] dp[2] = sum } return sum }
时间复杂度O(n)
空间复杂度O(1)
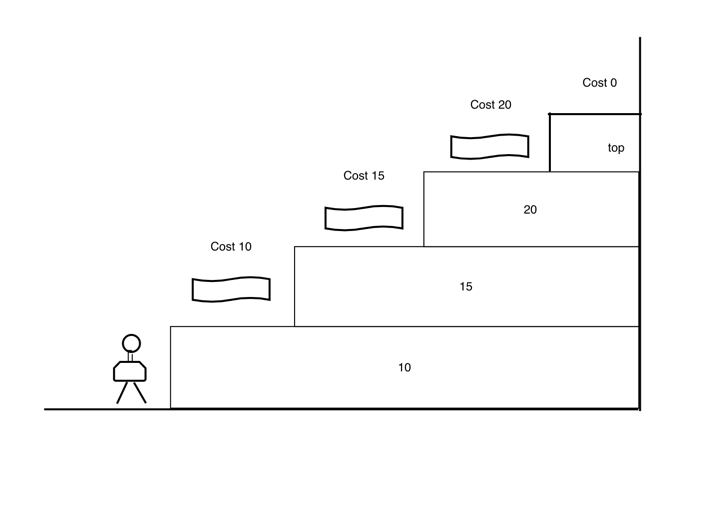
使用最小花费爬楼梯
使用最小花费爬楼梯 数组的每个下标作为一个阶梯,第 i 个阶梯对应着一个非负数的体力花费值 cost[i](下标从 0 开始)。
var a = []int{1,2} b := a b[1] = 3 fmt.Printf("a[0]地址:%p\n", &a[0]) fmt.Printf("a[1]地址:%p\n", &a[1]) fmt.Printf("b[0]地址:%p\n", &b[0]) fmt.Printf("b[1]地址:%p\n", &b[1])
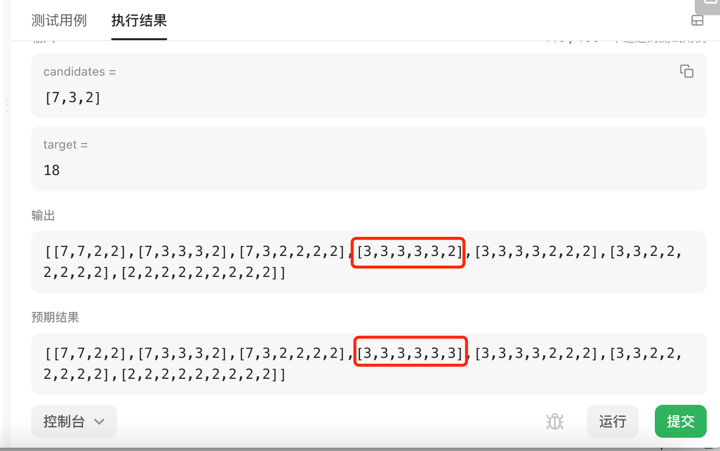
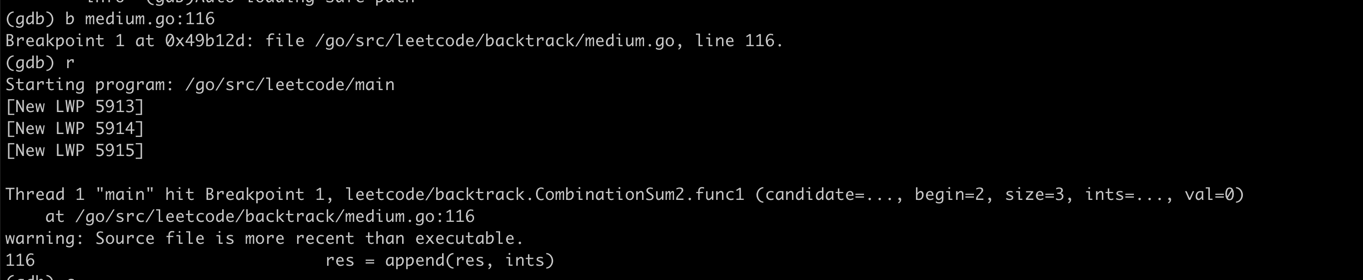
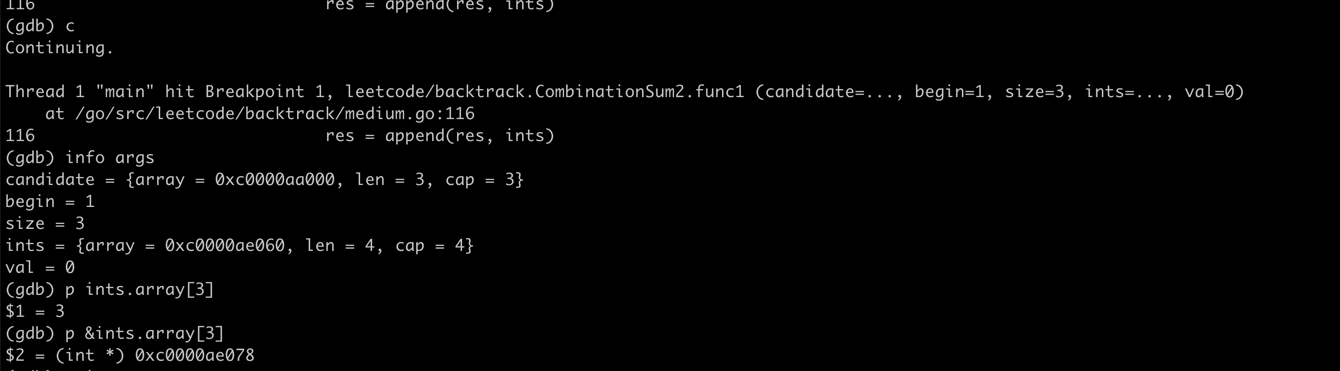
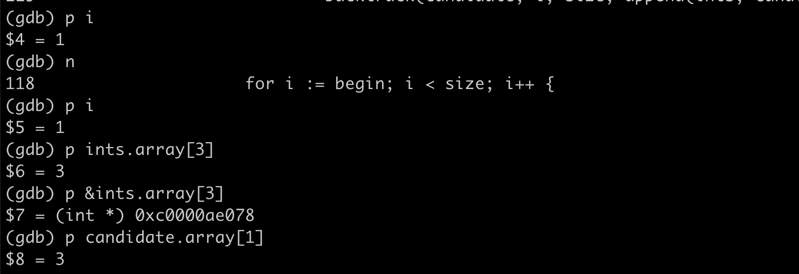
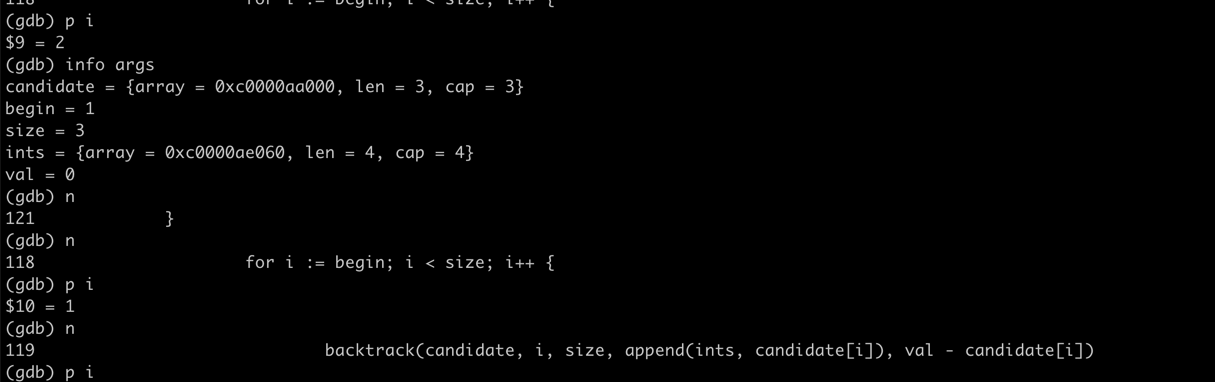
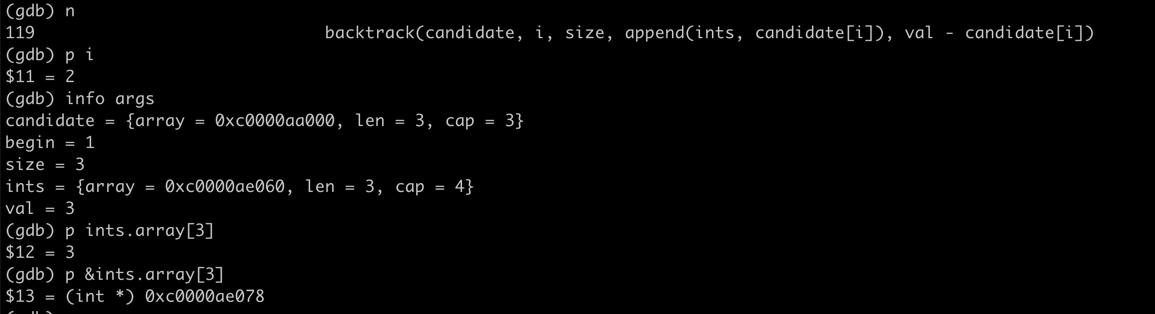
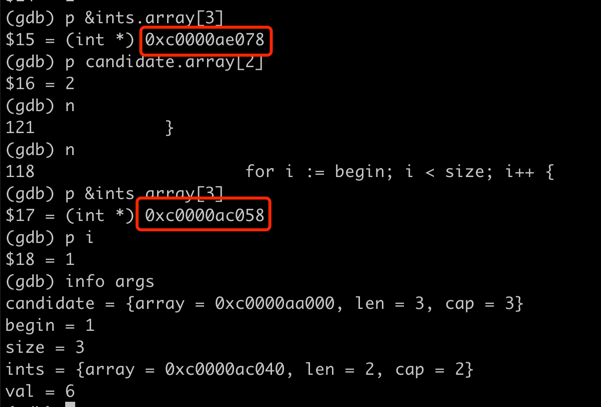
funcCombinationSum1(candidates []int, target int) [][]int { var res = make([][]int, 0) var backtrack func([]int, int, int, []int, int) backtrack = func(candidate[]int, begin, size int, ints []int, val int) { if val < 0 { return } if val == 0 { res = append(res, ints) } for i := begin; i < size; i++ { backtrack(candidate, i, size, append(ints, candidate[i]), val - candidate[i]) } } backtrack(candidates, 0, len(candidates), []int{}, target) return res }
查看输出:
1
[[7 3 2] [3 3 3 2] [3 3 2 2 2] [2 2 2 2 2 2]]
很明显[3 3 3 2]加起来不是12,和leetcode出现的问题是一样的
踩坑原因分析
一开始,先是在append处打印下ints变量内容,看看是不是路径和计算有问题
1 2 3 4
if val == 0 { fmt.Printf("append ints %v\n", ints) res = append(res, ints) }
funcCombinationSum1(candidates []int, target int) [][]int { var res = make([][]int, 0) var backtrack func([]int, int, int, []int, int) backtrack = func(candidate[]int, begin, size int, ints []int, val int) { if val < 0 { return } if val == 0 { var tmp = make([]int, len(ints)) copy(tmp, ints) fmt.Println("append after copied ints", tmp) res = append(res, tmp) } for i := begin; i < size; i++ { backtrack(candidate, i, size, append(ints, candidate[i]), val - candidate[i]) } } backtrack(candidates, 0, len(candidates), []int{}, target) return res }
输出:
1 2 3 4 5 6
append after copied ints [732] append after copied ints [3333] append after copied ints [33222] append after copied ints [222222] append after copied ints [228] [[732] [3333] [33222] [222222] [228]]